


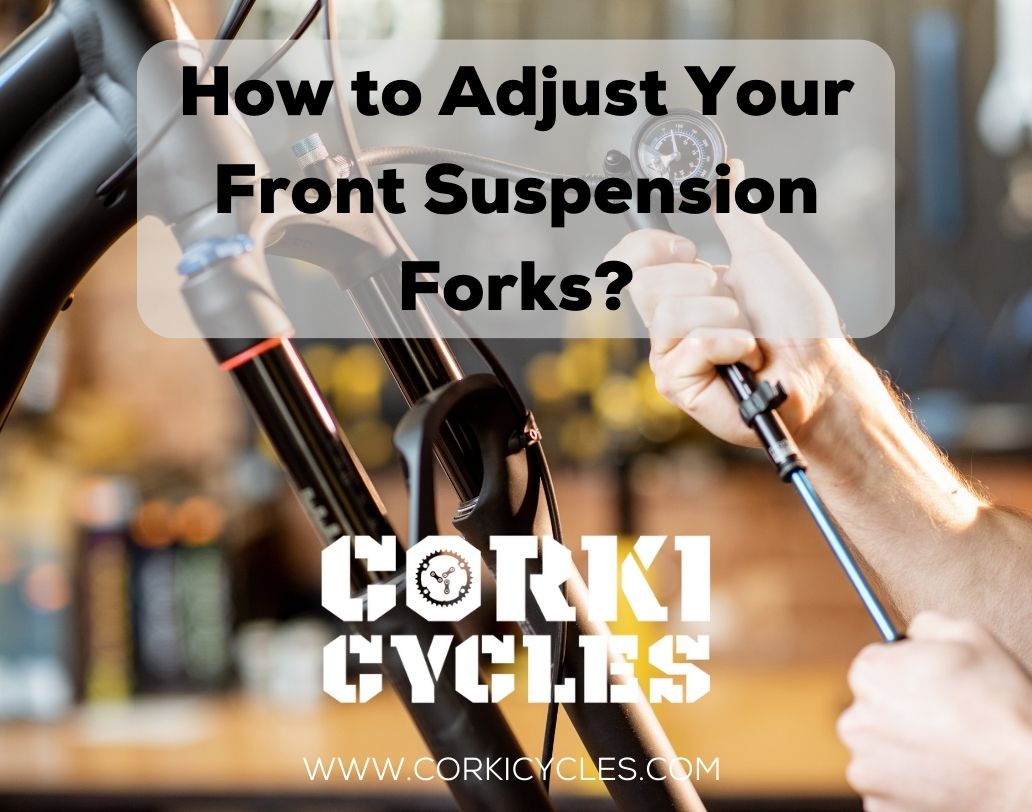
How to Adjust Your Front Suspension Forks Quickly?
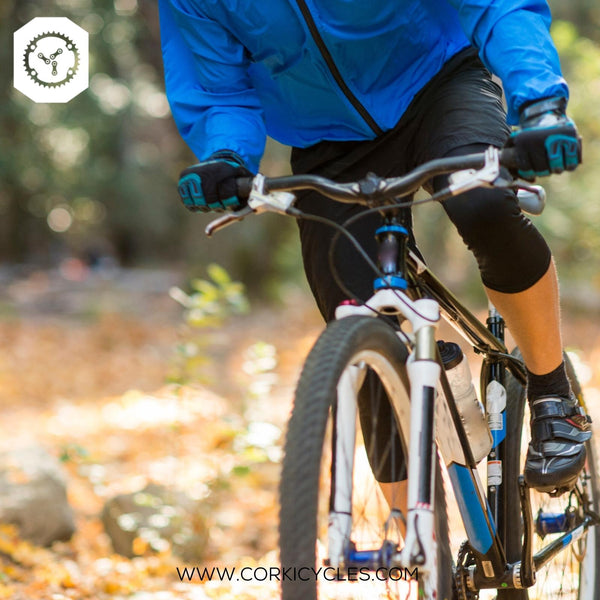
Are you looking to fine-tune your bike's front fork suspension for a smoother ride? Adjusting your front fork is the secret to a smoother and more responsive ride. However, not all bike forks are perfect straight out of the box. They need dialing in to get the very best riding.
In this guide, we'll walk you through the process of quickly adjusting your front fork. Let's dive in!
The following are the main points in this article included:
- What is the bike fork? (Just the main components of the fork)
- How to adjust your air suspension forks?
- How to adjust your air suspension forks: FAQs
- Conclusion
What is the bike fork?
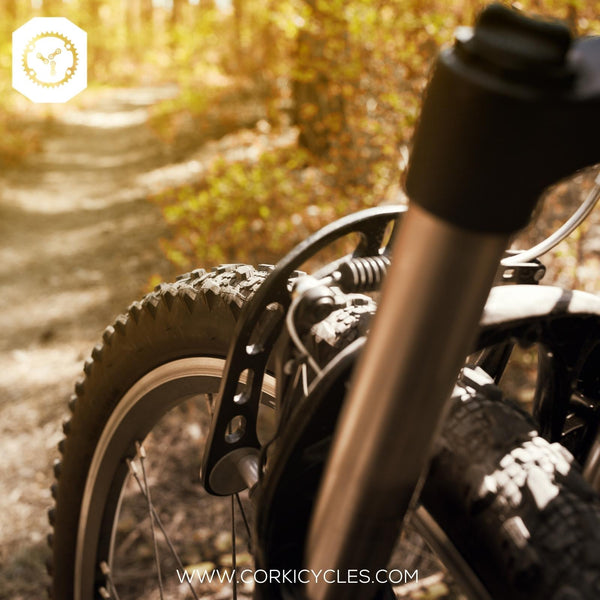
Generally, most bikes have two types of front forks: the rigid fork and the suspension fork. The key difference is that the suspension fork has shock absorbers and suspension components. In this article, we'll focus solely on suspension forks. However, if you're curious to know more about forks in general. Please check out our other article: "Everything You Need to Know About Front Suspension Forks" Now, let's dive right in!
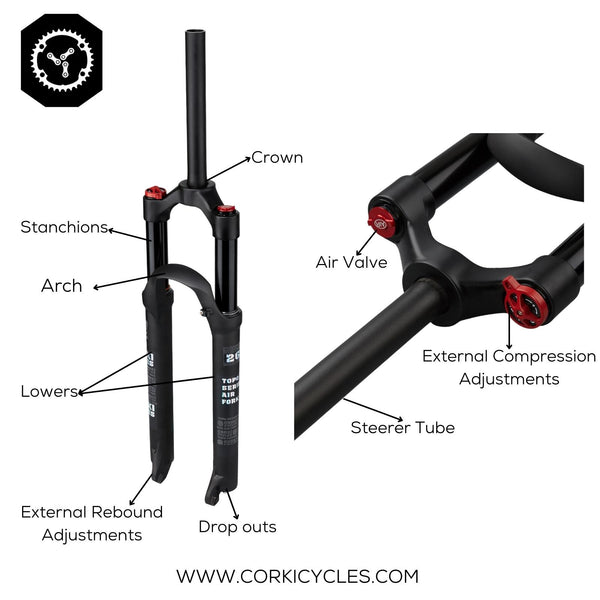
A suspension fork allows a bike to better absorb shocks from bumps and cracks in the road or varying terrain. Bikes with suspension typically offer a smoother ride because of it. The suspension bike fork is the best choice for most mountain bike riders. Inside a fork, you will have either a coil/springs or be air pressurized. These lower’s connect to the stanchion which in turn connects to the crown. The crown will have an air valve and external compression adjustment dial. At the bottom of the fork will be the external rebound dial adjustment.
How to adjust your air suspension forks?
Dedicating a couple of hours to fine-tuning your suspension unlocks a whole new level of biking excitement. Correctly tuned suspension can make a good bike feel great, but a poor setup can make a great bike feel terrible.
In this part, we will show you the steps to supercharge your bike for your unique riding style and favorite trails. Trust us! Optimizing your ride is rewarding and loads of fun! Get ready to elevate your biking experience and have a blast along the way. Let's dive in and make your suspension front fork more comfortable.
Tools needed to prepare:
Before you start the process of adjusting the front fork, you should make sure that you have these essential tools ready:
- O-ring or cable tie
- A pen and paper
- Shock pump with pressure gauge
- Measuring tape or meter stick
By having these tools, you can easily adjust the bike fork. Let's get started and get that suspension dialed in just the way you like it!
Step 1: Lockout adjustment
First, before you invest time optimizing your bike fork, you need to ensure that your suspension fork is in good working order. In addition, make sure the “Lock” knob is open.
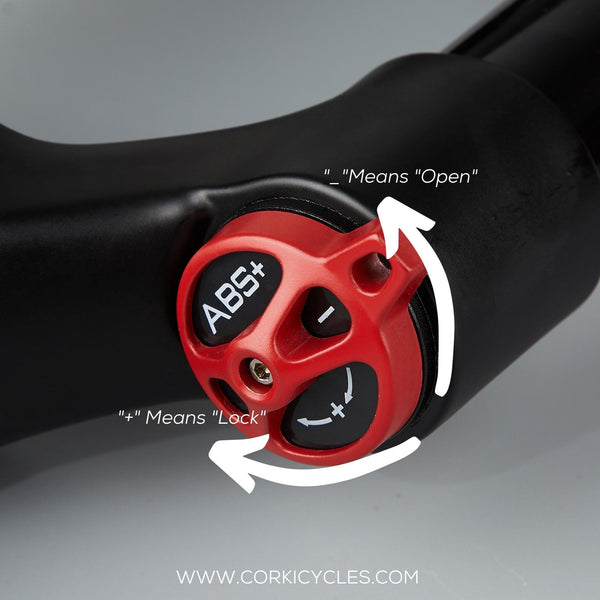
Many forks have a stanchion top lever to lock out the fork, which eliminates the travel. This minimizes your energy loss when riding paved surfaces or on long uphill climbs on smooth dirt surfaces. An upgrade option for some forks is on a handlebar-mounted lever. It remotely controls the lockout via a cable. If you’re not sure, look up your brand’s user manual to figure out where is lockout knob and which direction to turn the knobs.
Step 2: Set the correct air pressure
The first step to dialing in your fork is to set the air pressure of your suspension fork.
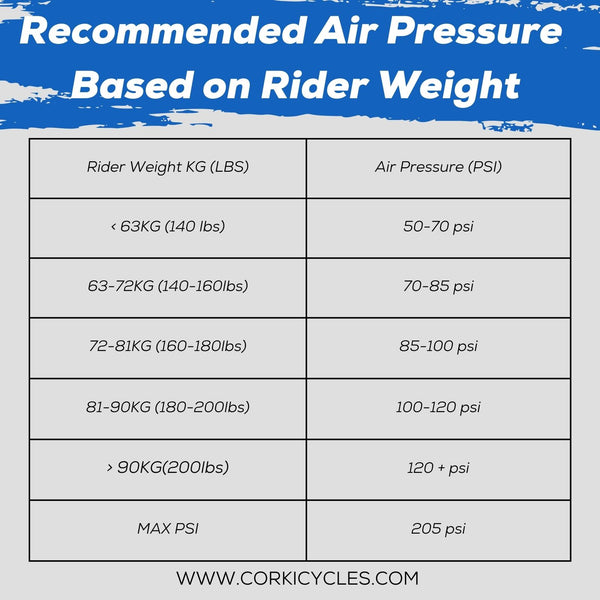
You might think it's a bit of a set-and-forget thing, but it also needs to be checked and maintained regularly. You will notice a big difference in the handling of your bike when the air pressure is adjusted to fit your weight and riding conditions.
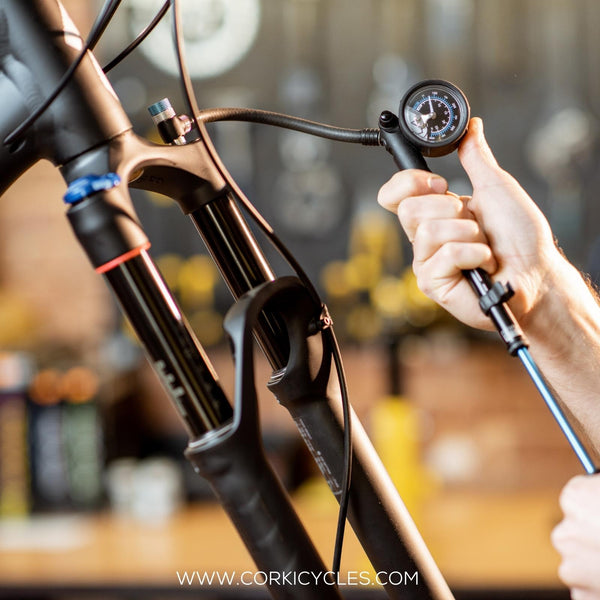
To adjust the pressure, you will need a shock pump. It's similar to a tire pump. But with a few variations specifically designed to suit the suspension forks.
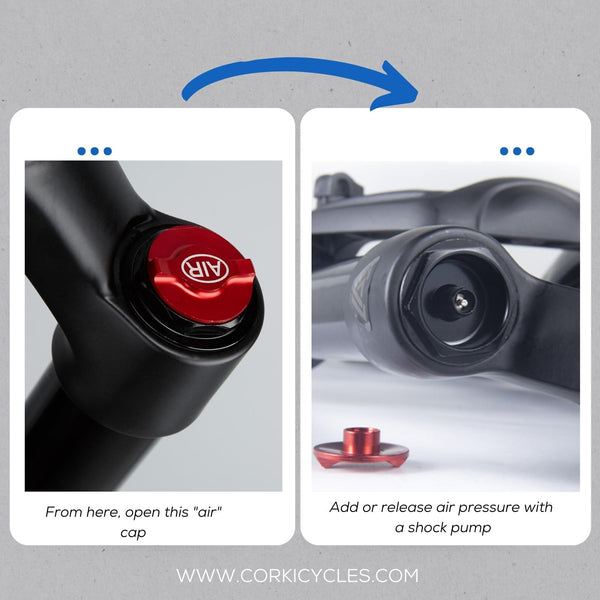
How to add air to your fork?
Firstly we can check the manufacturer’s recommendations for air pressure. This information can typically be found on a sticker on the fork itself or in the owner's manual. If you can't find it on the fork, check the manufacturer's website.
Secondly, remove the cap and connect the shock pump to the air valve on your fork. The valve is usually located at the top of one of the fork legs on the crown. Please ensure it's securely attached to prevent any air leakage.
Thirdly, you can pump the shock pump’s handle until the pressure gauge on the pump reaches the desired pressure setting. Then, remove the shock pump, and reattach the cap.
At this step, we recommend you follow the manufacturer’s suggestions. Then, make a fine-tune adjustment according to your riding style at the next step.
Step 3: Set your sag
After setting the correct air pressure, we need to adjust the bike fork’s sag. Sag refers to the distance of bike travel compressed downward as a percentage of total travel when you sit on the bike.
First, ensure your suspension fork is fully extended by bouncing on your bike or manually pulling up on the handlebars. Second, it might require you to jump on the bike in your normal riding position while someone supports you or against the wall. Hold onto the handlebars and position your weight over the fork. While in your riding position, push the O-ring or cable tie down the stanchion tube until it reaches the rubber fork seal.

After that, carefully dismount your bike without disturbing the fork's position. Use a measuring tape or meter stick to measure the distance between the O-ring or cable tie and the rubber fork seal. Write this number on the paper. Then, divide this number by the total travel and then multiply by 100 to get the percentage sag. For example, the compressed length is 18mm, and the total travel is 120mm. So, you will get (18mm/120mm) x 100=15%.
Ideally, the sag should be around 20-30% of your total fork travel. However, different riding styles and weights also influence the sag value. You should make a fine-tune adjustment according to your personal preferences.
More sag will make your fork softer, which will allow you to keep the fork in contact with the ground longer and increase stability while on the trail. If you have too much sag, you sit “into” the bike too much. This may increase the pressure of the pedals when riding in rough conditions. A smaller amount of sag will make your fork more responsive, but only for milder and smoother terrain. For example, if you ride the smooth road a lot and at most occasionally go down a step or something, you can use a smaller amount of sag.
For beginners of riding, manufacturers often provide suggested sag settings. If you don't have one, no worries! We recommend starting with a base setting of 20%.
If your sag is higher or lower than that, you need to make some adjustments. Attach your shock pump to increase or decrease the air pressure in the shock. Then run the calculation again. It's best to make adjustments in increments of 10 psi. After each adjustment, repeat the process to check if you've reached the desired sag.
Step 4: Adjust compression damping
Let's take a look at some of the settings for compression damping below. This switch on the fork looks complicated, and you may only know it to lock the fork. Simply put, it's there to control your fork to resist compression. This can usually be done by turning the switch.
Turn it off on long climbs, and you can improve your pedaling efficiency and not let go of power. Turning it on for downhill will provide effective damping and give the tires a better grip.
And when you want to ride in flatter off-road conditions, the middle setting will give you a balance between pedaling and damping.
With many forks, there is also a compression damping fine adjustment setting. This also affects how the fork responds to braking and small bumps.
If you find that you are always feeling resistance when pedaling. And if the fork travel is being eaten up too much when braking, then you will need to adjust it a little more. However, remember not to over-adjust it. Besides assisting with pedaling, the fork's primary role is to smooth out those bumps.
Step 5: Adjust rebound damping
What does the rebound and rebound damping mean? Most people will be confused. Rebound controls the return speed after the fork is compressed. Rebound damping control is relative to the amount of air pressure used. Look for the rebound adjuster knob or screw, usually located at the bottom of the fork leg.
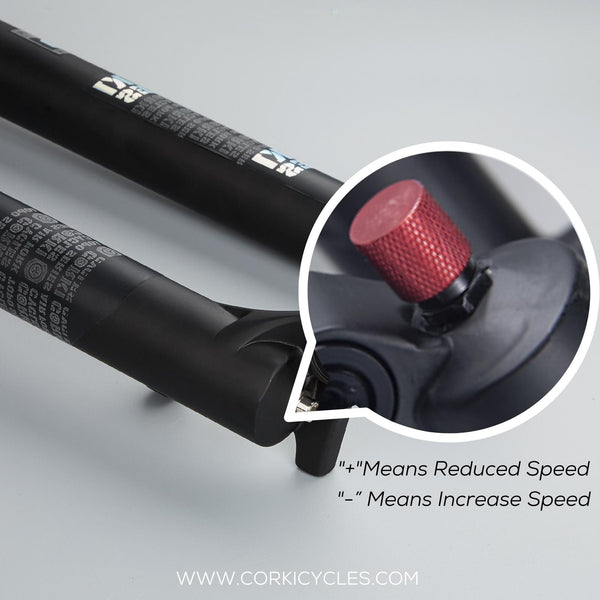
Rebound can drastically change the way your suspension functions as well as your overall control of the bike. Turn it clockwise to slow down the rebound or counterclockwise to speed it up. It is extremely important to have a balanced rebound setting that is not too fast or too slow. This will depend on the air pressure you run.
Higher pressures need more rebound, and lower pressures need less rebound. If you notice the front end has a dead feeling, rough on high-speed chatter, and not tracking in corners, your rebound setting is most likely too slow. If the rebound is too fast, your wheel will fall into more holes instead of skipping over the top of them. Handling will feel twitchy and hard to control. It will be easier to be thrown out of control on jumps and landings.
Repeat this step several times until you find the one that gives you a balanced and controlled feel.
Step 6: Test your front bike fork
Now that you've made adjustments, it's time to hit the road! As a final check, take your bike for a ride on various terrains and feel the difference.
First, try jumping off the curb, and see if the speed of the rebound is slow or quick. If you sit “into” the bike too long and feel the rebound is dead. This may show that you can take out some rebound or speed it up. On the contrary, if you feel the bounce's speed like a spring quickly. From here, you would slow it down.
Pay attention to how it feels on different terrains. If needed, make further small adjustments to achieve the perfect setup for your riding style and comfort.
How to adjust air suspension forks: FAQs
Got more questions about front fork adjustment? Don't worry. We've got you covered! Check out the FAQs below for additional information to find the answers you're looking for. It will help you out.
Do air forks lose air over time?
Yes, the air will be lost over time. Therefore, you need to check the fork frequently. Weather, frequency of riding, and more can all affect air and pressure being lost.
How often do you need to service the fork?
The bike fork is an important part of a bicycle. As such, a little regular attention is warranted. According to most manufacturers, it should be done every 8 weeks of riding. This results in the consistent and smooth performance of the spring and damper while also keeping the fork/shock's mechanical condition in good shape for the longest possible lifespan.
Do air forks need oil?
Yes, air forks typically require a small amount of oil for lubrication and proper functioning. The oil is primarily used in the seals and bushings of the fork to reduce friction and ensure smooth operation.
Conclusion
Congratulations! You now know how to adjust your front fork suspension for a smoother and more enjoyable ride.
With this guide, you'll find the perfect suspension setting for your style and terrain. Plus, you'll gain a better understanding of how each part of your suspension works and how they all impact each other. It's all about customizing your ride and getting the most out of your bike! Get this knowledge to adjust your bike suspension fork.
Thank you for reading! If you have any comments or questions, please leave them below.
Suspension Related Articles
Everything You Need to Know About Front Suspension Forks
Mastering Mountain Bike Fork Maintenance: Expert Tips for Peak Performance
How Do You Mount an MTB Front Suspension Fork? Quick and Easy Guide