


How to Replace Disc Brake Pads on a Mountain Bike?
Brake pads are an essential component of your bike's braking system. Without them, you can’t stop. And using your sneakers is no way to slow down, either.
It's critical to check your brakes regularly and the first thing to check is the pad thickness. Without functioning brake pads, you would have difficulty stopping your bike quickly and effectively. This can also can lead to accidents and other dangerous situations. To avoid this, you should change the brake pads regularly to ensure proper braking performance.
In this guide, we will cover the below on disc brake pads and how to change them.
- Why replace bike brake pads?
- Signs that it's time to replace disc brake pads
- How to replace disc brake pads on a mountain bike?
- Suggestions for replacing disc brake pads
- Conclusion
Why Replace Bike Brake Pads?
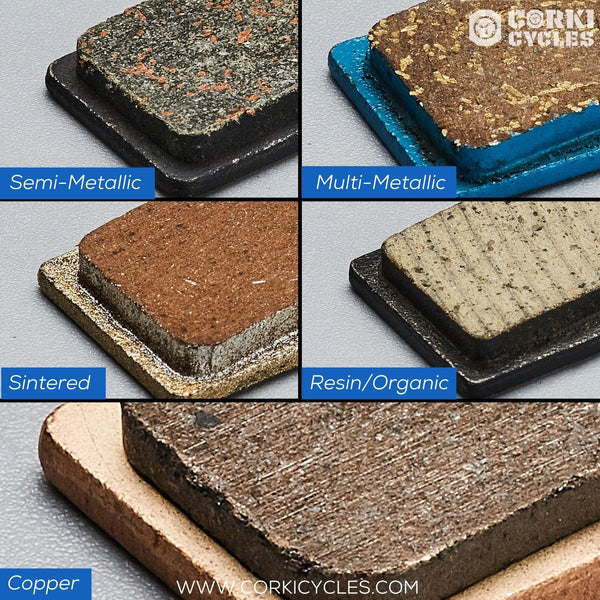
As brake pads are used, the material on their surface begins to wear down. The common materials are resin/organic, multi-metallic pads, or copper/fully metallic pads.
Several reasons can cause pads to wear—friction, heat, poor maintenance, and poor installation. Worn-out brake pads can cause several problems. For example, it affects stopping power, increases brake noise, and decreases braking efficiency.
Suppose the brake pads become too worn. They can start to damage the rotors and calipers. Replacing a brake caliper is expensive, so regularly changing your disc brake pads is a much cheaper alternative.
Additionally, new brake pads provide improved braking performance. And reduce the chances of damaging the rotors. So installing new brake pads is an excellent way to improve your brake system's performance and safety.
Signs That It's Time to Replace Disc Brake Pads?
Brake pads need regular replacing since they can pick up dust and dirt from riding.
But how do you know when you need to replace your brake pads?
Disc brakes have different signs, but they have some common wear symptoms.
There are several signs that show it's time to replace your bike brake pads. These include:
Reduced Braking Performance
If your bike takes longer to stop or the brakes feel less responsive than usual, it’s a great sign. For example, when you’re pulling the lever and it’s getting closer against the handlebar to stop. This could mean worn pads and more force is needed. In addition, it could mean your brake cable needs tightening for mechanical disc brakes. If hydraulic disc brakes, it could further mean the brake fluid needs changing.
Squeaking Noises
Disc brake pads can squeak and squeal when worn down as it makes improper contact with the disc rotor. Squeaking noises can also occur when there is a lack of friction between the brake pad and the rotor.
To check, you will need to clean the rotor and also inspect the disc brake pads for any contaminants. After cleaning and checking the alignment of your bike's disc rotors and pads, and you still hear a harsh sound. It could state that the brake pads need replacing.
Vibrations
Bike brake vibrations refer to a phenomenon where the bike frame or handlebars shake or vibrate when the brakes are applied. This could lead to a severe problem since it could affect the rider's control of the bike. Various factors can bring on bike brake vibrations. For example, a worn-out brake pad, an uneven rotor surface, or crooked brake calipers. You can check and replace your old bike brake pads to resolve these problems.
If the diagnosis of the problem after your inspection is the disc caliper, go to a local bike shop for assistance to fix it.
Thin Brake Pads
To inspect the brake pads, check the gap between the pads and rotor when the disc caliper isn’t braking. If it is a couple of millimeters on each side of the pads they are worn. Disc brake pad thicknesses can vary, but generally, they're about 4mm thick when brand new. Notice when your brakes are new, there's less distance to pull for the brake lever.
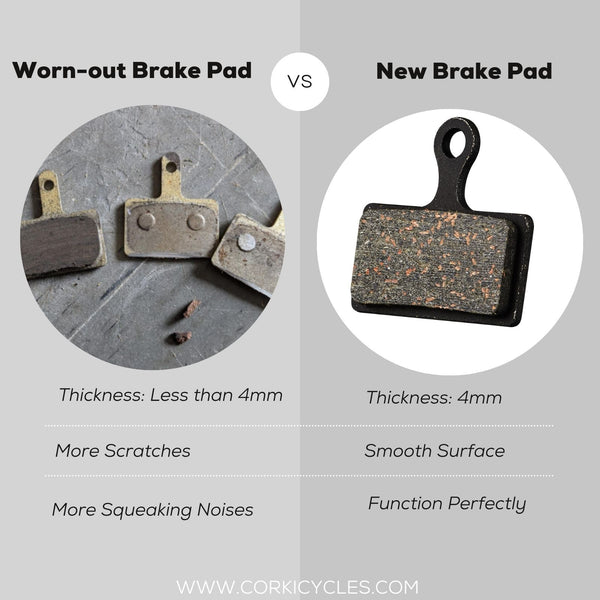
Over time it is inevitable pads will wear out. You'll have to squeeze the lever a bit more to get the same stopping power. If you continue to use old disc brake pads, you will risk the metal behind the pad rubbing directly on the disc rotor. If you thought squeaking brakes were bad, wait till you hear the brake’s metal pad against the disc rotor! Always preemptively change brake pads to never have the metal disc brake pad rubbing on the rotor.
How to Replace Disc Brake Pads on a Mountain Bike?
In this section, I will go over changing disc brake pads. Here's a step-by-step guide to help you replace your brake pads:
Step 1: Prepare Tools and Materials
Before you start, please make sure that you have the following essential tools:
- A bicycle stand or a vice to hold the bike in place
- New bike disc brake pads
- 5mm Allen wrench
- Long nose pliers
- Clean rag or a brush
- Gloves
Step 2: Remove The Wheel From The Bike
The first step in changing your mountain disc bike brake pads is to remove the wheel. To do this, loosen the bolts for the thru-axle or untighten the quick-release handle. Once the bolts or QR handle is loose, lift the wheel out of the frame.
Step 3: Remove The Old Brake Pads
With the wheel removed, you'll be able to access the brake pads in the disc caliper. The brake pads will either be held in the caliper with a bolt or a cotter pin. No matter how you’ll need to remove that pin or bolt to slide the brake pad out. Different disc brake models have different styles. Always check with the manufacturer if you are having difficulties.
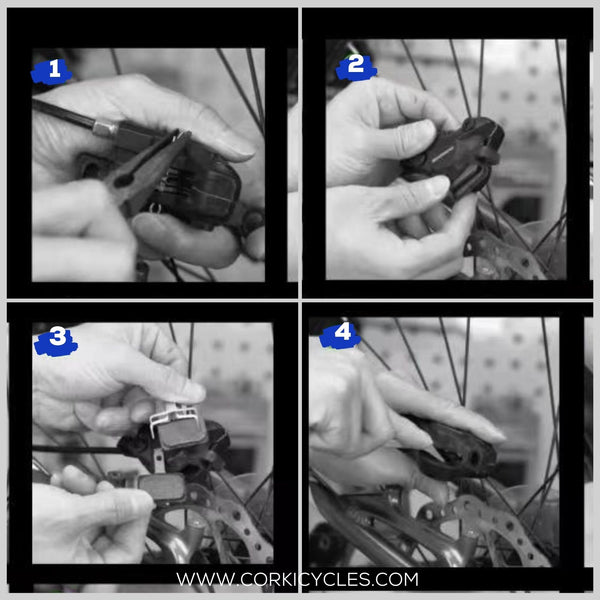
If a bolt holds your pads in place, there may be a tiny safety clip or cotter pin on the opposite side of the bolt. Sometimes pressing and lifting is the best practice while with other models, once the pin is removed, the pads slide out. For this, you might need to use long nose pliers to remove the retaining clip that holds the pad in place. Gently pull the pad out of the caliper once you remove the clip.
Step 4: Clean The Brake System
Once the pad is out, it is necessary to clean the brake calipers before putting in a new brake pad. First, you can wipe down the calipers with a clean rag to clear all dust or dirt that has been collected. While doing that, check that the disc brake pad calipers are clean and free of lubricants, grease, or oils.
Ensuring the disc brake caliper is clean of any debris ensures that when the new pads are inserted, they are inserted equally. Completely balanced. Uneven brake pad insertion is usually caused by dirt or debris.
Step 5: Install The New Brake Pads
First, place the new pads into the caliper, ensuring they align correctly. Then, push the pads into the caliper with your hand or long-nose pliers. Finally, replace the retaining pin to hold the pads in place.
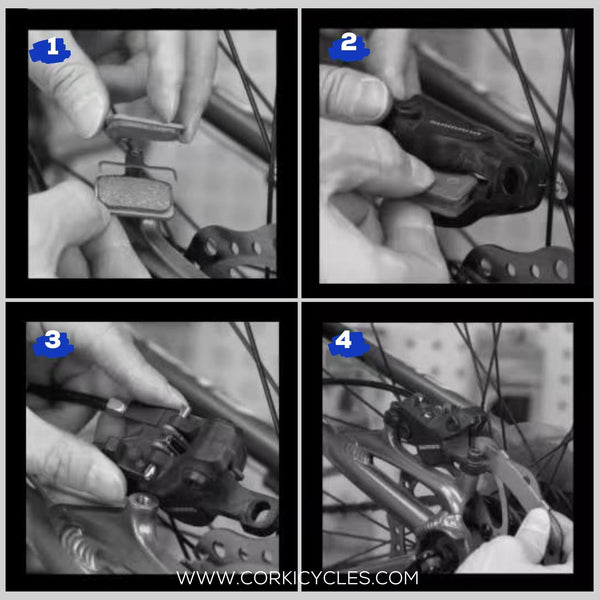
After inserting the pads and clipping the pin, double-check the alignment to see if the calipers are even on each side.
Step 6: Reinstall The Wheel
With the new brake pads installed, it's time to reinstall the bicycle wheel. Align the hub axle or quick-release skewer with the front fork or rear wheel housing. Tighten with an Allen wrench for a thru-axle or by hand with a quick-release skewer. Always check the wheel is correctly inserted and the disc rotor is correctly in the brake caliper.
Step 7: Test The Brakes
Finally, it's time to test the brakes. After checking the rotor is working, spin the bike’s wheel and squeeze the lever of the brake. After a few times of braking, the pads will bite and start working.
With your brakes correctly functioning, you can take a test ride for one last to double-check before hitting the local trails. If there are any issues, remove the wheel and check the brake pads caliper. Sometimes the new pad’s thickness can affect the smoothness. Another frequent issue is the brake pads caliper isn’t even on one side. If these are the cases, reinstall or wear the pad down slightly. If you are unsure, please visit your local bike shop.
Suggestions for Replacing Disc Brake Pads
Mountain biking is an exciting and challenging sport. But, it requires the right equipment and maintenance to keep you safe on the trail. Below are a few additional tips to change your disc brake pads more efficiently.
Use High-Quality Brake Pads
Invest in high-quality disc brake pads designed for your specific bike and riding style. Brake pads come in many compounds, including resin/organic, sintered, semi-metallic, and ceramic or copper. Choose the brake pads that best suit your needs. For example, in general city riding, you can use an organic pad, but metallic or copper brake pads are better for all steep mountain terrain.
Clean The Rotors
Before installing the new brake pads, make sure the rotors are clean and free of debris. Dirty rotors can cause the brake pads to wear out faster and reduce braking performance. Also, ensure the rotor has no oil or lubricants, as this greatly affects braking performance.
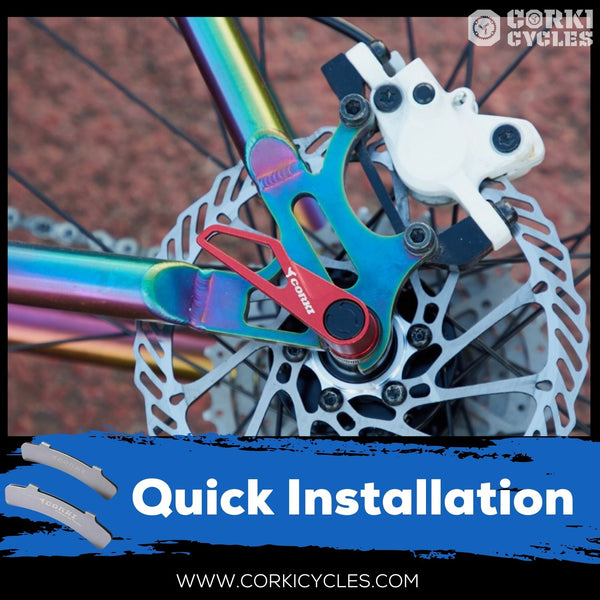
Disc Brake Rotor Alignment Tool
If the brake pads are not aligned with the rotor, it may cause the pads to rub or the rotor to make an awful sound. This reduces the disc brake pad's life and braking effectiveness. With a simple alignment tool, you can adjust the positioning of your disc brake pads and rotor easily.
Conclusion
Replacing disc brake pads on a mountain bike is a simple process that can be done in a matter of minutes. Regular brake pad replacement ensures proper braking performance. While regularly performing brake checks can also extend the rotor and caliper life.
By following this guide, you can easily replace the brake pads on your bike ensuring efficient braking.
Have fun out there on the trails!
If you have any comments or questions, please leave them below.
Related Articles You May Need: